Android Studio - Could not resolve all dependencies for configuration ':app:_debugUnitTestCompile

Android Studio
Error:
Could not resolve all dependencies for configuration ':app:_debugUnitTestCompile
It can happen if you have proxy settings and you are not connected to it.
Create and Edit gradle.properties
C:\Users\NAME\.gradle\.gradle.properties
systemProp.http.proxyHost=www.somehost.org
systemProp.http.proxyPort=8080
systemProp.http.proxyUser=userid
systemProp.http.proxyPassword=password
systemProp.http.nonProxyHosts=*.nonproxyrepos.com|localhost
systemProp.https.proxyHost=www.somehost.org
systemProp.https.proxyPort=8080
systemProp.https.proxyUser=userid
systemProp.https.proxyPassword=password
systemProp.https.nonProxyHosts=*.nonproxyrepos.com|localhost
other:
1.Download gradle
2.untar and set gradle home dir in Android Audio
C:\Program Files\Android\Android Studio\gradle\gradle-x.x
OpenStack Liberty 安裝上遇到的問題及解法

Control Server Install
------------------------
$ packstack如果失敗,解決問題後用以下指令繼續安裝
$ packstack --answer-file=/root/packstack-answers-xxxxxxxxxx.txt
Q&A
-------------------------
<<< DB >>>Q1:
Icehouse puppet DB pid error
A1:
$ vi /usr/lib/python2.7/site-packages/packstack/puppet/templates/mongodb.pp
pidfilepath => '/var/run/mongodb/mongod.pid'
Q2:
Error: Execution of '/usr/bin/yum -d 0 -e 0 -y install mongodb-server' returned 1: Yum command has been deprecated, redirecting to '/usr/bin/dnf -d 0 -e 0 -y install mongodb-server'.
A2:
$ vim /usr/share/openstack-puppet/modules/mongodb/manifests/params.pp
- $pidfilepath = '/var/run/mongodb/mongodb.pid'
+ if ($::operatingsystem == 'fedora' and versioncmp($::operatingsystemrelease, '23') >= 0 or
+ $::operatingsystem != 'fedora' and versioncmp($::operatingsystemrelease, '7.0') >= 0) {
+ $pidfilepath = '/var/run/mongodb/mongod.pid'
+ } else {
+ $pidfilepath = '/var/run/mongodb/mongodb.pid'
+ }
ps: operatingsystemrelease, '23' or 22 or 21 or other
Q3:
packstack get python-eventle error
A3:
删除最新版本, pip uninstall eventlet
再重新安装0.15版本解决,用yum自带的吧yum reinstall python-eventle
Q4:
ERROR : Error appeared during Puppet run: x.x.x.x_keystone.pp
Error: /Stage[main]/Neutron::Keystone::Auth/Keystone_user[neutron]:
Could not evaluate: Execution of '/usr/bin/keystone --os-auth-url http://127.0.0.1:35357/v2.0/
token-get' returned 1: The request you have made requires authentication.
A4:
$ mysql
mysql> use keystone;
mysql> delete from token;
mysql> delete from user;
Q5:
ERROR : Error appeared during Puppet run: x.x.x.x_provision_demo.pp
Error: Failed to apply catalog: Can't retrieve net-show because Neutron or Keystone API is not available.
Unable to find network with name 'from gi.repository import GnomeKeyring'". Retrying for 5 sec.
Notice: Puppet::Type::Neutron_network::ProviderNeutron: Unable to complete neutron request due to non-fatal error: "Execution of '/usr/bin/neutron net-show --format=shell from gi.repository import GnomeKeyring' returned 1: /usr/lib/python2.7/site-packages/keyring/backends/Gnome.py:6: PyGIWarning: GnomeKeyring was imported without specifying a version first. Use gi.require_version('GnomeKeyring', '1.0') before import to ensure that the right version gets loaded.
from gi.repository import GnomeKeyring
Unable to find network with name 'from gi.repository import GnomeKeyring'". Retrying for 1 sec.
Error: Failed to apply catalog: Can't retrieve net-show because Neutron or Keystone API is not available.
A5:
** You can "fix" (?) this problem by modifying the top of /usr/lib/python2.7/site-packages/keyring/backends/Gnome.py, replacing this:
try:
from gi import Repository
if Repository.get_default().enumerate_versions('GnomeKeyring'):
from gi.repository import GnomeKeyring
except ImportError:
pass
With this:
try:
from gi import Repository, require_version
if Repository.get_default().enumerate_versions('GnomeKeyring'):
require_version('GnomeKeyring', '1.0')
from gi.repository import GnomeKeyring
except ImportError:
pass
NOVA Client install
------------------------
$ yum install openstack-nova-compute sysfsutils$ egrep -c '(vmx|svm)' /proc/cpuinfo
If this command returns a value of one or greater, your compute node supports hardware acceleration which typically requires no additional configuration.
If this command returns a value of zero, your compute node does not support hardware acceleration and you must configure libvirt to use QEMU instead of KVM.
Edit the [libvirt] section in the /etc/nova/nova.conf file as follows:
[libvirt]
virt_type = qemu
$ service openstack-nova-compute start
$ service messagebus start
$ service libvirtd start
$ chkconfig openstack-nova-compute on
$ chkconfig libvirtd on
or
$ systemctl enable libvirtd.service openstack-nova-compute.service
$ systemctl start libvirtd.service openstack-nova-compute.service
== On server side check ==
nova service-list
nova image-list
GTA 5 game crash ERR_GFX_D3D
這個問題,我已經更新到到最新的驅動程式及patch
試過了以下所有方法(請不要試)
1.改seting檔 2 or 1 to 0 強迫用 DirectX 10
2.刪除兩個遊戲目錄下的檔案....開遊戲更新後不就又恢復了嗎? 很呆, 但我是還試了.
3.把草的顯示品質調低
4.把垂直同步....等一堆功能調低或關閉......等等
以上都不是正確的解法

1.下載 nvidiaInspector
2.程式開啟後點選Diver Version旁的圖案, 查看顯示卡官方出廠的GPU clock是多少,目前超頻了多少.
3.點選Show overclock,再右邊選項調低GPU clock至公版出廠值.
4.點選apply clocks&change你會發現左邊GPU會降低.
5.點選create clock shortcute,如果重開機設定會恢復, 在桌面點此捷徑可恢復降頻設定.
經過調整後GTA 5 再也沒有當機出現ERR_GFX_D3D的錯誤當機狀況
試過了以下所有方法(請不要試)
1.改seting檔 2 or 1 to 0 強迫用 DirectX 10
2.刪除兩個遊戲目錄下的檔案....開遊戲更新後不就又恢復了嗎? 很呆, 但我是還試了.
3.把草的顯示品質調低
4.把垂直同步....等一堆功能調低或關閉......等等
以上都不是正確的解法
真正的原因....顯示卡出廠時就已經超頻了

2.程式開啟後點選Diver Version旁的圖案, 查看顯示卡官方出廠的GPU clock是多少,目前超頻了多少.
3.點選Show overclock,再右邊選項調低GPU clock至公版出廠值.
4.點選apply clocks&change你會發現左邊GPU會降低.
5.點選create clock shortcute,如果重開機設定會恢復, 在桌面點此捷徑可恢復降頻設定.
經過調整後GTA 5 再也沒有當機出現ERR_GFX_D3D的錯誤當機狀況
Tag :
Game


HTC M8 root後 安裝官方更新 及 換機感想
root後如何安裝官方更新?
M8 root方法網路上多如牛毛, 我不再贅述.
root後要執行官方更新, 在網路上有許多錯誤說法,
其實很簡單的...
1.只要沒有亂刪除內建APP或檔案, (ex Android 4.4 upgrade to 5.0.1就必須使用4.4原廠的recovery)
刷回原廠Recovery image 就可以正常更新了!!
fastboot flash recovery ori-recovery.img
2.更新完後再刷回第三方recovery即可.
2.更新完後再刷回第三方recovery即可.
fastboot flash recovery 3-party-recovery.img
3.If fail ....更新完開機卡在HTC ONE
(1)先刷對應要安裝版本的recovery
(2)Custom recovery 安裝 ROM之前
在 "WIPE" 這裡只選擇 "wipe system" (其他的 data 不要wipe)
(ex:M8_UL_L50_SENSE60_MR_hTC_Asia_TW_4.24.709.3_V0.0.zip )
(3)然後recovery 刷ROM "restore rom", 可保留原本的資料
另外如果只是要用TWRP升System, EX: 4 --> 6
1.分位用原廠Recovery及OTA升級應可完成,通常是卡後面的系統檔案檢核不過
刷機先確認機子裡的系統分位是哪個版本,用指令察看 fastboot getvar all (version-main:)
2.Wipe cache 及 dalvik cache (data不要wipe)
3.TWRP Restore 選 Boot 和 System
4.畫面會停在HTC One一陣子,有聽到開機聲音就有在升級 (手機怎麼沒有一個 I/O 燈號?)
其他事項:
強制重開機方式 : 電源鍵+音量放大鍵 10秒
你真的需要 S-OFF嗎?
手機不需要做S-OFF, 必竟為了安全考量, 有需要~再刷需要的軟體就好, 把System下檔案資料可隨意讓程式寫入,不是什麼聰明的事, 可以su ,在執行備份及日常的操作已上經足夠.
換機感想
HTC J 後, 我換了HTC M8 金.
而WiMAX隨LTE 4G的誕生, 看來也將走入歷史.
M8 金屬質感非常美麗,稱得上頂級工藝, 但是非常的滑手,
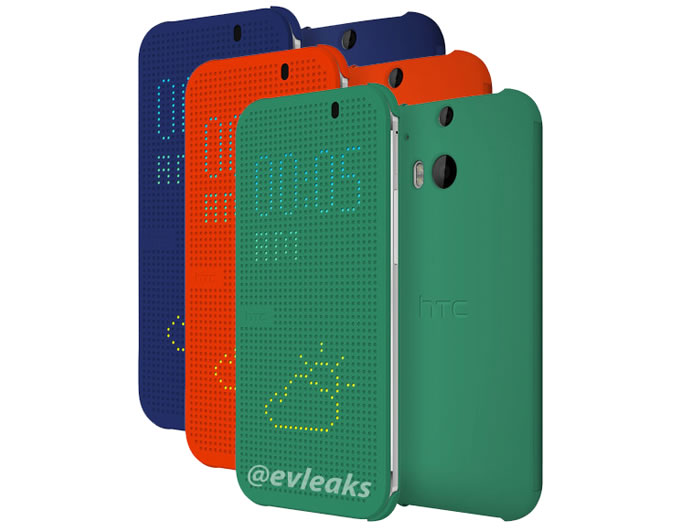
DOT View是HTC非常棒創新產品,我非常喜愛,
而且剛好能解決滑手的問題. 推薦必買.
後記
8/25
M8我使用三個多月後, 某天相機鏡頭破了. 並沒有摔到或碰撞.
是否有其他網友遇到相同的狀況? (HTC報價700)
畢竟小弟我在眾多HTC手機中,我第一次遇到. 不過上網一查, 真是嚇一跳. 看來不是單一事件.
HTC One (M8): Camera lens cover issue
HTC One M8鏡頭:竟如此弱不禁風
M8後鏡頭刮花?油汙?
HTC One (M8): Camera lens cover issue
HTC One M8鏡頭:竟如此弱不禁風
M8後鏡頭刮花?油汙?
Nexus 7 觸控亂跳問題解決 (ghost input)
以下所談到的 非 2013 Nexus 7
-----------------------------------
我喜愛的鋼琴遊戲及神魔之塔都無法正常執行,比我買2999白牌的平板觸控還糟糕100倍.
難不成要我送修ASUS,一查看網上一堆人吃悶虧,不如自己想辦法好了.
Google也許解決不了它自己的產品問題,但是搜尋器總有點用處吧,
拾人芽慧, 比坐以待斃來的可靠.
XDA總是有神人的出現, 彷彿救世主.我終於找到一篇像樣的文章了.
原來問題的答案是.............電 流 干 擾
很蠢得答案, 但是, 就是這麼蠢.
我們就來點解法, 很簡單, 很便宜,
網路上謠傳更新軟體版本後修正,事實上不能.
我覺得是電流因軟體及個人使用方式而改變,所以有時關掉後能舒緩一下活潑亂跳的觸控.
ASUS製程設計上,看來需要好好要求一下.別丟國人的臉阿.
我覺得是電流因軟體及個人使用方式而改變,所以有時關掉後能舒緩一下活潑亂跳的觸控.
ASUS製程設計上,看來需要好好要求一下.別丟國人的臉阿.
1.用你的指甲來協助打開Nexus後蓋.
2,將紅框標示的電線位置下面墊一個塑膠墊 (到那找塑膠墊阿 !!!!)
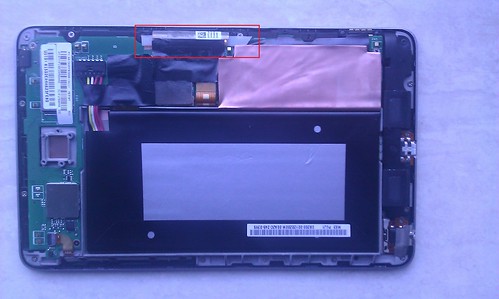
3.拿便利商店就有的吸管用剪刀對半裁切出一小塊就可以了, 從下面穿近去.
吸管完美而自然的弧度剛好包裹住.提供適當的支撐與阻隔,渾然天成.
活潑亂跳的觸控終於不再來煩我了.
活潑亂跳的觸控終於不再來煩我了.
4.但是觸控偶爾失靈的現象仍然會有. 只能關銀幕再開.
...............完..................2013/08/27
2013/11/27
三個月後, 亂跳是沒發生了, 但是觸控失靈嚴重,
滑動時常會突然停止, 認為手指已提起,
而Touch test從新機買回後,從沒10點觸控正常過, 還是忍耐了數月,
現在只好在保固內趕緊送回華碩修了.
2013/11/30
三天內就送修回來了,觸控恢復正常,宅配到家。
維修內如容寫更新軔體,恢復出廠預設值. 雖然有點瞎, 但至少是很快速的修好了.
2013/11/27
三個月後, 亂跳是沒發生了, 但是觸控失靈嚴重,
滑動時常會突然停止, 認為手指已提起,
而Touch test從新機買回後,從沒10點觸控正常過, 還是忍耐了數月,
現在只好在保固內趕緊送回華碩修了.
2013/11/30
三天內就送修回來了,觸控恢復正常,宅配到家。
維修內如容寫更新軔體,恢復出廠預設值. 雖然有點瞎, 但至少是很快速的修好了.
Line 3.7.0 Rilakkuma 拉拉雄(輕松熊) 風格
網路上有多LINE 主題, 我喜歡其中一款 Rilakkuma, 很適合女生用,
但是沒找到3.7.0的版本, 所以就用網路上的資源隨意下載一版,(抱歉實在是搞不清處出了)
我在下載回來的版本中, 修改了幾張圖示,
讓LINE更有 Rilakkuma的風格.


1.LINE 3.7.0 -Rilakkuma 下載
2.Rilakkuma Theme 下載
(1)請到LINE設定安裝兔兔的主題,並套用,
(2).然後將剛剛下載的theme檔案覆蓋下面已存在的檔
SDCARD\Android\data\jp.naver.line.android\theme\a076xxxxxxxxxxxxxxxxxxxxx
(3)到LINE設定套用原設定,再套用一次兔兔的主題,就完成,
Ps:如果裝的是原版, 請先移除再裝, 如果曾經裝過任合一個改過的版本, 直接安裝即可.
但是沒找到3.7.0的版本, 所以就用網路上的資源隨意下載一版,(抱歉實在是搞不清處出了)
我在下載回來的版本中, 修改了幾張圖示,
讓LINE更有 Rilakkuma的風格.


1.LINE 3.7.0 -Rilakkuma 下載
2.Rilakkuma Theme 下載
(1)請到LINE設定安裝兔兔的主題,並套用,
(2).然後將剛剛下載的theme檔案覆蓋下面已存在的檔
SDCARD\Android\data\jp.naver.line.android\theme\a076xxxxxxxxxxxxxxxxxxxxx
(3)到LINE設定套用原設定,再套用一次兔兔的主題,就完成,
Ps:如果裝的是原版, 請先移除再裝, 如果曾經裝過任合一個改過的版本, 直接安裝即可.